SAP installation tasks
This topic describes the SAP installation tasks for LiveCompare.
Install the LiveCompare Add-on
LiveCompare’s SAP components are provided as an ABAP Add-on which should be installed on each SAP system that will be used with LiveCompare. The ABAP Add-on may be installed using either a .PAT or .SAR file. These files may be found in the ABAP_Addon distribution directory.
Note: If the SPAU/SPDD phase is encountered during the installation of the Add-on, select the ‘Reset’ or ‘Reset to Original’ option to reset the /ICORP/* objects back to original in the SPDD/SPAU process. Do not try to ‘Adjust’ the objects, because SAP will prompt for a valid license for the /ICORP/ namespace.
Note: The LiveCompare Add-on does not need to be installed on SAP systems that will only be used to run the SAP HANA Migration Assessment app.
To install the LiveCompare Add-on, carry out the steps in one of the following two sections.
Use the supplied .PAT file
To install the LiveCompare Add-on using the supplied .PAT file, carry out the following steps.
-
Copy the supplied .PAT file from the
<LiveCompare distribution dir>\ABAP_Addon directoryto the/usr/sap/trans/EPS/indirectory on your SAP server machine. If the operating system is UNIX, the authorization mode of the files must be set to 777 ensuring Read, Write and Execute permissions, and the file must be copied in upper case. -
Log in to the SAP system on which LiveCompare is to be installed, using client 000, as a user with sufficient privileges to update the Data Dictionary.
-
Run transaction
SAINTand select the Installation Package > Load Packages > EPS Files from Application Server menu option. The following message box is displayed.
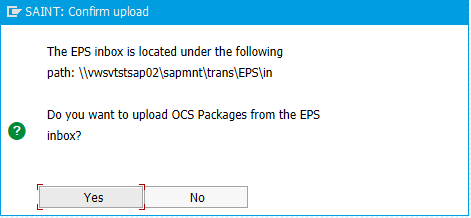
-
Click ‘Yes’. Click
 in the SAINT: Uploading Packages from the File System screen. The following screen is displayed.
-
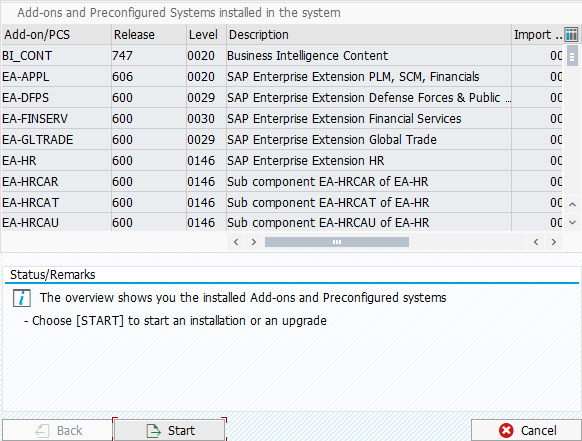
Click ‘Start’. The following screen is displayed.

-
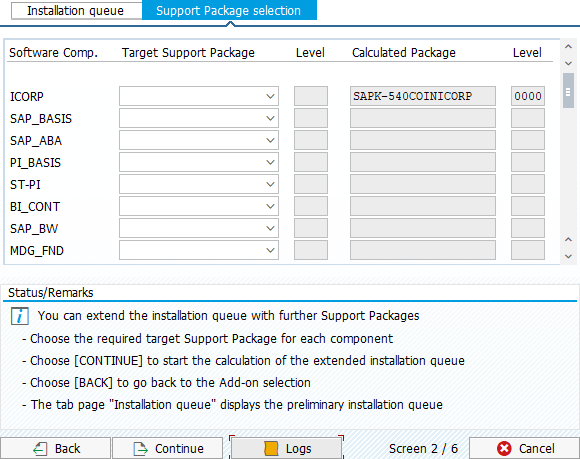
Select the ICORP Add-on with Release 540_700, and click ‘Continue’ to display the ‘Support package selection’ tab.

-
Click ‘Continue’ to display the ‘Installation queue’ tab.

-
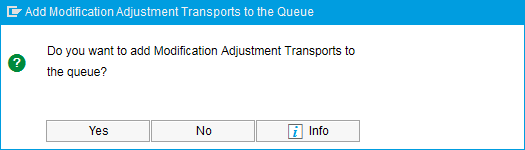
Click ‘Continue’ to install the package. The following message box is displayed.

-
Click ‘No’. The following message box is displayed.
-
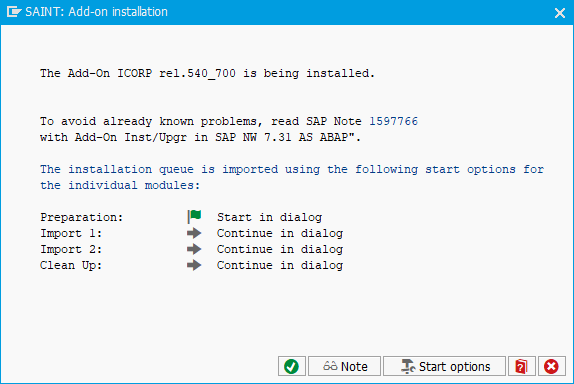
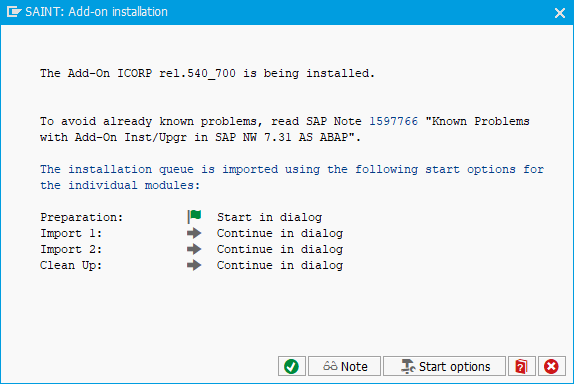
Click
 to start the installation of LiveCompare 2024.1 patch 4. When the installation has finished, the following screen is displayed.
-
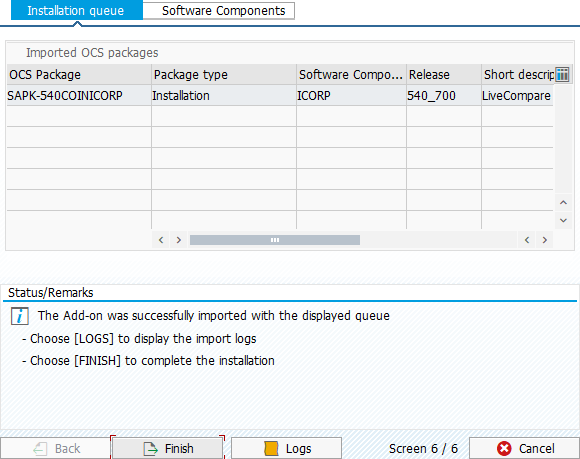
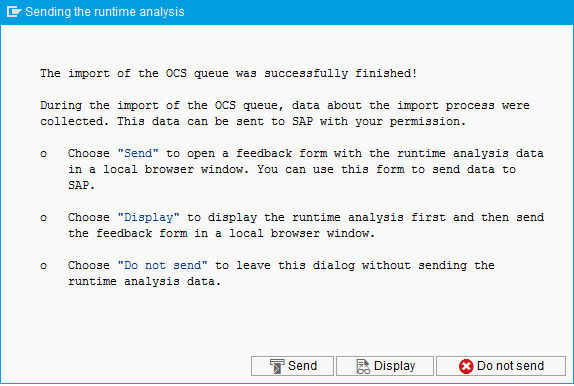
Click ‘Finish’ to complete the installation. The following message box is displayed.
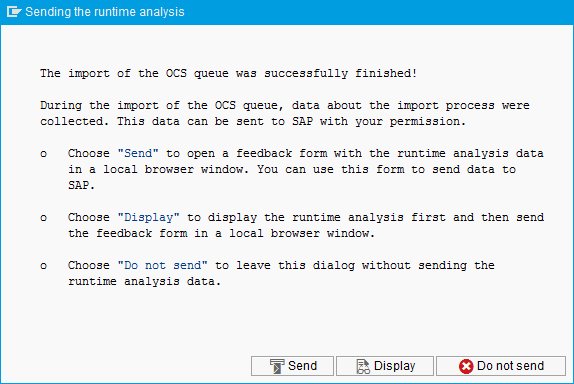
-
Click ‘Do not send’.
Use the supplied .SAR file
To install the LiveCompare Add-on using the supplied .SAR file, carry out the following steps.
-
Copy the supplied .SAR file from the
<LiveCompare distribution dir>\ABAP_Addondirectory to a temporary folder on your local machine. -
Log in to the SAP system on which LiveCompare is to be installed, using client 000, as a user with sufficient privileges to update the Data Dictionary.
-
Run transaction
SAINTand select the Installation Package > Load Packages > From Front End menu option. -
Browse for the .SAR file above and click ‘Open’.
-
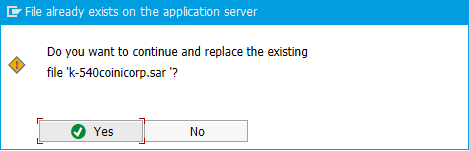
If the following message box is displayed, click ‘Yes’ to replace the existing file.
-
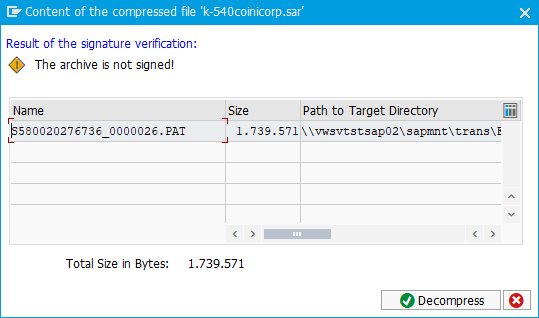
The following dialog is displayed.
-
If you receive an error stating that the installed version of SAPCAR does not support verification of signed archives, this may be resolved by downloading the latest version of SAPCAR from the SAP Support portal at https://support.sap.com and installing it in the SAP kernel directory.
Alternatively, run transaction SPAM using client 000 and select Settings from the Extras menu. In the ‘Import Queue’ tab, deselect the ‘Check for digital signature of the imported OCS Packages’ check box.
-
Click ‘Decompress’ to upload the package. The status bar should display the following:
File ‘k-540coinicorp.sar’ successfully transferred, decompressed, and then deleted
-
Click ‘Start’ in the Installed Add-ons screen. The Add-on selection screen is displayed.

-
Select the ICORP Add-on with Release 540_700, and click ‘Continue’ to display the ‘Support package selection’ tab.
-
Click ‘Continue’ to display the ‘Installation queue’ tab.

-
Click ‘Continue’ to install the package. The following message box is displayed.
-
Click ‘No’. The following message box is displayed.
-
Click
to start the installation of LiveCompare 2024.1 patch 4. When the installation has finished, the following screen is displayed.

-
Click ‘Finish’ to complete the installation. The following message box is displayed.
-
Click ‘Do not send’.
Generate Authorization Profiles
The LiveCompare ABAP Add-on is installed using client 000, however the authorizations and roles delivered with the Add-on are client-dependent. To make the authorizations and roles available to the client against which LiveCompare will be run, carry out the following steps:
-
Log in to the SAP system using the client against which LiveCompare will run.
-
Run transaction
PFCGto display the Role Maintenance screen. -
Enter
/ICORP/LC_CORE_AUTHS3in the Roles field and click .
. -
In the Change Roles screen, select the ‘Authorizations’ tab, and in the Maintain Authorizations and Generate Profiles section, click
Change Authorization Data. -
In the Change role: Authorizations screen, click
 to generate the authorization profiles.
Install BW components
LiveCompare’s BW components are provided as SAP transports. To install these components, carry out the following steps:
-
If the SAP_BW component version is installed, access the
R3Inst\<SAP release>\Optional\BW (Include if BW component installed)\SAPBWfolder and import all the BW transports in the order of their named subdirectories. The transports in theInstallThird-7.5subdirectory should be installed on BW 7.5 systems only. -
If the BW4HANA product version is installed, access the
R3Inst\700\Optional\BW (Include if BW component installed)\SAPBW\BW4HANAfolder and import the transport.
Import the transports
To import the LiveCompare BW transports, carry out the following steps:
-
Log in to the SAP client from which LiveCompare is to be run.
-
Access the R3Inst folder that contains the transports to be installed. Copy the file(s) beginning with ‘K’ to the SAP system’s
\usr\sap\trans\cofilesdirectory, and the file(s) beginning with ‘R’ to the SAP system’s\usr\sap\trans\datadirectory. -
Please note the following when copying the transport files:
-
For UNIX servers, you must log in with the root user ID to copy the files, and then set the authorization mode of both the copied files and the directories to Read, Write and Execute for all users (chmod 777).
-
For Windows servers, you must log in as <sid> adm. The directories to which you copy the files must be in NTFS format, and the copied files must be writeable.
-
If you copy the files from the distribution directory to your SAP server using FTP, be sure to transfer the files in binary mode.
-
Use the
STMStransaction to import the transports. When importing the transports, you should always select ALL import options. -
Review the transport logs for condition codes greater than 4. If any errors are found, please contact Tricentis Technical support.
Install HR components
LiveCompare’s HR components are provided as SAP transports. To install these components, carry out the following step:
-
If the SAP_HR or S4HCM component version is installed, access the
R3Inst\<SAP release>\Optional\HR(Include if HR component installed)folder and import all the HR transports in the order of their named subdirectories. For SAP releases greater than 700, use the 700<SAP release>directory.
Import the transports
To import the LiveCompare HR transports, carry out the following steps:
-
Log in to the SAP client from which LiveCompare is to be run.
-
Access the R3Inst folder that contains the transports to be installed. Copy the file(s) beginning with ‘K’ to the SAP system’s
\usr\sap\trans\cofilesdirectory, and the file(s) beginning with ‘R’ to the SAP system’s\usr\sap\trans\datadirectory. -
Please note the following when copying the transport files:
-
For UNIX servers, you must log in with the root user ID to copy the files, and then set the authorization mode of both the copied files and the directories to Read, Write and Execute for all users (chmod 777).
-
For Windows servers, you must log in as <sid> adm. The directories to which you copy the files must be in NTFS format, and the copied files must be writeable.
-
If you copy the files from the distribution directory to your SAP server using FTP, be sure to transfer the files in binary mode.
-
Use the
STMStransaction to import the transports. When importing the transports, you should always select ALL import options. -
Review the transport logs for condition codes greater than 4. If any errors are found, please contact Tricentis Technical support.
Install the authorizations required for integration with SAP Solution Manager
If you plan to use LiveCompare to search SAP Solution Manager Test Repositories, install the required SAP authorizations on each SAP Solution Manager system you will be using with LiveCompare.
-
Log in to the SAP client from which LiveCompare is to be run.
-
Access the
R3Inst\SAP Solution Managerfolder. Copy the file beginning with ‘K’ to the SAP system’s\usr\sap\trans\cofilesdirectory, and the file beginning with ‘R’ to the SAP system’s\usr\sap\trans\datadirectory. -
Please note the following when copying the transport files:
-
For UNIX servers, you must log in with the root user ID to copy the files, and then set the authorization mode of both the copied files and the directories to Read, Write and Execute for all users (chmod 777).
-
For Windows servers, you must log in as <sid> adm. The directories to which you copy the files must be in NTFS format, and the copied files must be writeable.
-
If you copy the files from the distribution directory to your SAP server using FTP, be sure to transfer the files in binary mode.
-
Use the
STMStransaction to import the transport. When importing the transport, you should always select ALL import options. -
Review the transport logs for condition codes greater than 4. If any errors are found, please contact Tricentis Technical support.
Install the ChaRM integration components
LiveCompare may be configured to perform an impact analysis on a ChaRM request’s associated transports when the status of the ChaRM request changes (for example, it moves to ‘To be tested’). To install the ChaRM integration components, carry out the following steps on the SAP Solution Manager system running ChaRM:
-
Access the
R3Inst\700\Optional\ChaRMfolder. Copy the file beginning with ‘K’ to the SAP system’s\usr\sap\trans\cofilesdirectory, and the file beginning with ‘R’ to the SAP system’s\usr\sap\trans\datadirectory. -
Please note the following when copying the transport files:
-
For UNIX servers, you must log in with the root user ID to copy the files, and then set the authorization mode of both the copied files and the directories to Read, Write and Execute for all users (chmod 777).
-
For Windows servers, you must log in as <sid> adm. The directories to which you copy the files must be in NTFS format, and the copied files must be writeable.
-
If you copy the files from the distribution directory to your SAP server using FTP, be sure to transfer the files in binary mode.
-
Use the
STMStransaction to import the transport. When importing the transport, you should always select ALL import options. -
Review the transport logs for condition codes greater than 4. If any errors are found, please contact Tricentis Technical support.